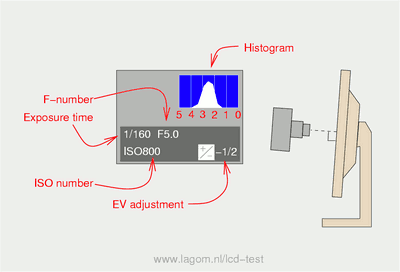
 Measuring the contrast ratio with a camera. Note how the camera is
held close to the screen.
 The contrast ratio is the ratio between the amount of light coming from the screen when it is displaying bright white, and the amount of light when it is supposed to be display pure black. Typical LCD monitors have contrast ratios ranging from 150:1 to 800:1. For general applications (photo editing, office work), one could consider 400:1 or higher a fairly good contrast. However, if you watch a movie from such a monitor in a darkened environment, you will still notice that "black is not really black". Most laptop monitors have pretty low contrast ratios (150:1 when viewed straight-on and below 80:1 at relatively small angles).
Manufacturers often inflate the contrast ratio numbers, so one shouldn't rely on that number for making a purchase decision. For example, the number could be measured for a contrast setting that blows away the details in the lighter tones (see the Contrast test), or only for a very restricted viewing angle. Large-size monitors (above 20 inch) often suffer from "backlight bleed" near the edges, which means that the contrast ratio is lower near the bottom and top. Some monitors will turn down the backlight when the display is dark ("dynamic contrast"), a trick which some people may find disturbing while watching a movie.
It is possible to measure the actual contrast ratio with a digital camera. You can submit your results to the Contrast-ratio database so that other people can compare it.
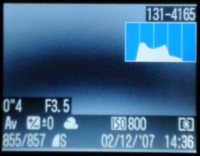
The idea is simple: take a picture of a white area and of a black area on the screen. The brightness of the picture, combined with camera settings such as ISO, F-number, and shutter time tells us how much light comes off the screen in either case. For the most accurate results, all camera settings should be identical, except for the shutter time, which is chosen such that both pictures end up as a middle grey.
These are the minimum settings:
Cameras vary in how easy it is to adjust the exposure. A good starting point seems to be ISO 400, F 2.8, and shutter times of 1 and 1/400 second. (For laptop screens, use 1/4 and 1/400 second). Always keep the same ISO and F number for the two images, and vary the shutter times if necessary to get two images with approximately the same mid-grey level (2.5 stops below saturation). Also try to keep the shutter times between 2 and 1/500 second. Set the camera to a low-resolution mode; it will reduce image noise. Also don't try to focus on the screen, because we are not interested in seeing individual pixels.
If the above is cryptic, you can try the following procedure:
Then proceed with the test as follows.
If you enter the brand and model of your monitor along with the the photo upload, your test results will be helpful to other users.
If you don't use the upload form, you can proceed as follows.
You can also try the white and black squares below instead, for example if your monitor has some kind of dynamic contrast. Make sure that you point the camera lens accurately to either a black or a white square.
You can also check the procedure with the images below, which should have a contrast ratio of about 4:1, if your display gamma is correct (see the Gamma calibration test).
| 25% luminance | 100% luminance |
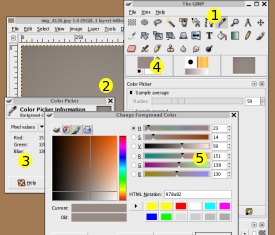
 Picking RGB values in GIMP.
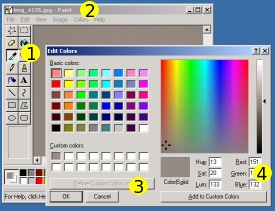
 Picking RGB values in MS Paint.
If your camera does not have a histogram, or a histogram without a scale, and you don't want to upload your photos for some reason, you can open the JPG image file in an image editing program such as the GIMP or MS Paint. Of course, there are plenty of other programs, too, but these are easy to get. This method is more accurate than looking at the histogram, but also more time-consuming. The RGB values are converted into luminances (relative to image saturation) according to the sRGB standard [Wikipedia] or Adobe RGB standard [Wikipedia]. Most consumer-grade cameras use sRGB.
Especially with the black image, there might be a considerable difference between the center and the edges. In that case take the RGB values at the lighter parts of the image.
GIMP is available for all common platforms (Linux, Mac, Windows) and is free. [download]. Select the color picker tool (1; it looks like an eye dropper). Set the "sample average radius" to 50 or so and click at a representative part of the image (2). Depending on the GIMP version, you will get a popup with the RGB values (3), or you can click on the currently selected color (4) to get a window with the RGB values (5).
MS Paint is included in Windows (it's under the Accessories menu). Select the color picker tool (1; it looks like an eye dropper). Click at a representative part of the image. Then go to Colors (2) → Edit Colors → Define Custom Colors (3) and read the RGB values (4). Repeat this a few times and calculate the average RGB values.
I guess that it's fairly evident how this test works. The result should be fairly reliable if your camera can show a histogram. There are a number of error sources:

The form also shows the absolute luminance as calculated from the data entered. All numbers should be known and not guessed or this number will not be meaningful. And even then, the real ISO numbers of cameras may vary considerably from one camera model to the next, so don't take this number as an absolute truth.
The calculation assumes that the sensor or RGB image saturates at a luminance
where f# is the aperture number, and t is the exposure time. This equation uses the "standard output sensitivity (SOS)" definition of the digital ISO value. [see Wikipedia]. From some experiments with a calibrated luminance meter and various cameras, it appears that the actual sensitivies can differ considerably from this equation, and that it is not always consistent on the same camera at different "ISO" settings. Here are the numbers for a couple of cameras:
| Camera model | ISO setting | F-number | Ratio real/nominal |
|---|---|---|---|
| Canon Powershot A540 | 80 | 5.5 | 1.4 |
| 100 | 5.5 | 1.5 | |
| 200 | 5.5 | 1.5 | |
| 400 | 5.5 | 1.4–1.5 | |
| 800 | 5.5 | 1.4 | |
| Canon Powershot A710IS | 80 | 4.8 | 3.0 |
| 200 | 4.8 | 1.2 | |
| 800 | 4.8 | 1.3 | |
| Nikon D40 | 400 | 8.0 | 1.8 |
| 1600 | 5.6 | 2.0 | |
| Nikon Coolpix 990 | 100 | 4.0 | 2.0 |
| 200 | 4.4 | 1.60 | |
| 400 | 5.6 | 0.80 | |
| Nikon D80 | 100 | 7.1 | 2.1 |
| 400 | 7.1 | 2.1 | |
| 1600 | 9.0 | 2.8 | |
| Olympus Camedia C-350 zoom | 128 | 5.2 | 2.30 |
| Sony Cybershot DSC-P120 | 100 | 5.2 | 2.3 |
| 100 | 10.0 | 2.2 | |
| 400 | 5.2 | 1.7 | |
| Sony Cybershot DSC-W1 | 100 | 5.2 | 1.8 |
| 200 | 10.0 | 2.0 | |
| 200 | 5.2 | 1.9 | |
| 400 | 5.2 | 1.7 |
The column "Ratio real/nominal" is defined as the measured ISO/SOS sensitivity divided by the number provided by the camera. For these cameras, the luminances (in cd/m2) provided by this pages should be divided by this number. For example with a Canon Powershot A540, this page may report a black level of 0.5 cd/m2, but actually, the black level is 0.5/1.4 = 0.36 cd/m2
© Copyright Han-Kwang Nienhuys, 2008. The text and accompanying images may not be redistributed. This includes placing the images on other websites, either as a copy or through hotlinking. Read more...